Wednesday, October 26, 2011 0 comments

world’s cheapest android tablet ‘Aakash’

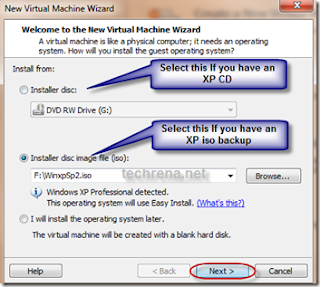
            India’s answer to high end tablets ‘Aakash’ ,the ultra low cost Android tablet , has now become a reality. Aakash , touted as the world’s cheapest tablet,  comes at an incredible price of just Rs 2999 for open market while government will offer at subsidized rate of Rs 1750 to secondary students . 
         The device runs on Android 2.2 Froyo using 366Mhz processor and sports 7”resistive touchsreen. It comes loaded with 256 MB RAM and 32 GB expandable memory slot. The device is capable of offering Wi_fi connectivity. Government will purchase one lakh tablets from DataWind for Rs 2250 . Datawind plans to offer the tablet in the open market from November’ 2011.


The commercial version of the tablet will come with cellular modem to internet access which will be missing in tablets supplied to the government.

Aakash Tablet Specifications

Hardware:
  •     Processor: Connexant with Graphics accelerator and HD Video processor
  •     Memory (RAM): 256MB RAM / Storage (Internal): 2GB Flash
  •     Storage (External): 2GB to 32GB Supported
  •     Peripherals (USB2.0 ports, number): 1 Standard USB port
  •     Audio out: 3.5mm jack / Audio in: 3.5mm jack
  •     Display and Resolution: 7” display with 800×480 pixel resolution
  •     Input Devices: Resistive touch screen
  •     Connectivity and Networking: GPRS and WiFi IEEE 802.11 a/b/g
  •     Power and Battery: Up to 180 minutes on battery. AC adapter 200-240 volt range.
Software:
  • OS: Android 2.2
  • Document Rendering
  • Supported Document formats: DOC, DOCX, PPT, PPTX, XLS, XLSX, ODT, ODP
  • PDF viewer, Text editor
  • Multimedia and Image Display
  • Image viewer supported formats: PNG, JPG, BMP and GIF
  • Supported audio formats: MP3, AAC, AC3, WAV, WMA
  • Supported video formats: MPEG2, MPEG4, AVI, FLV
  • Communication and Internet
  • Web browser – Standards Compliance: xHTML 1.1 compliant, JavaScript 1.8 compliant
  • Separate application for online YouTube video
  • Safety and other standards compliance
  • CE certification / RoHS certification
More info available about its distribution after completing its testing to selected students.! Click here for more
Tuesday, October 11, 2011 43 comments

Dc Unlocker Crack Version For Free Download (Unlock any modem free..!!!!!!)

As you know Dc unlocker is used to unlock many usb modems and phones as we are here for free unlocking methods to get out barriers form you mobile operators so today i am here going to give you Crack version of Dc Unlocker Client so enjoy unlocking modem for free of cost you dont have to pay dc team. 
DC Unlocker + DC Crap Download For Free

Download Dc Unlocker and Dc Crap From Below Link
Download Dc Unlocker + DC Crap
(Please Choose Free Or Slow Download option To download File From Filesonic)

Installation Process
Hope you had downloaded the file so here is a guide how to install Dc Unlocker Crack to install it just follow this steps
  1. First of all open Zip file and install dc-unlocker_client-1.00.0597_2.exe From it have a look on below screen shotsCc Crack 11 Dc Unlocker Crack Version For Free Download\
  2. Then Open Zip File and Select Unlock ZTE you can select following window Select DC Crap From IT.
    Cc Crack 3 Dc Unlocker Crack Version For Free Download
  3. Now Extract DCCRAP.EXEon your desktop Cc Crack 4 Dc Unlocker Crack Version For Free Download
  4. Now You are Done Just Open DCCRAP.EXE and Enjoy unlocking.

Sunday, August 14, 2011 5 comments

Install and Run Windows XP in Windows 7 Using VMware Player..!!


Easiest Way to Play with Virtualization

VMware Player allows anyone to try new operating systems without rebooting. Easy Install makes creating virtual machines with the latest 32-bit and 64-bit Windows and Linux operating systems easier than installing them directly on your PC. Run over 200 supported operating systems including Windows 7, Chrome OS, Ubuntu 10.04, and many other versions of Windows, Linux, and more.


Windows XP has been the most famous and most useful operating system to its users till date. Well even if we are have to migrate to Windows 7, we will never forget the ability of Windows XP. There are a lot of programs which were supported by Windows XP but not in the later versions like Windows Vista and Windows 7. Now when we migrate to Windows 7, we will not be able to run such programs.

In order to solve the problem of incompatibility of software and drivers in Windows 7, we have been given the option of installing Virtual Windows XP using Microsoft Virtual PC. But the lone problem in this option is that the processor should support Virtual Machine.

Here we have given a technique with which you will be able to run Windows XP in Windows 7 without any Virtual XP software or Virtualization Supporting Processor. Moreover you can use your own CD or ISO backup of Windows XP to create the Virtual Machine and no need of downloading the XP Virtual PC from Microsoft.
Requirements:
Windows 7 installed Machine
Minimum 1 GB RAM.
Minimum 4 GB Free Hard Disk Space
Windows XP backup either CD or ISO file
OR

If you have downloaded Microsoft Virtual XP Mode, then refer the instruction at Step 6.
Step 1: Download and Install VMware Player 3.0.1. The download Links are given below.
Size: 90.0 MB

Download VMware Player 3.0.1 from VMware

or

Download VMware Player 3.0.1 from FileHippo.com

Follow the normal instructions and install. Restart your computer after installation.

Step 2: Now we have to create a new Virtual Machine. Open VMware and click Create a New Virtual Machine as shown below.


Step 3: Select the location from which you are going to create the new Virtual Machine. If you have a CD then select the drive. If you have a back up file in an iso, then you can select the file.


Step 4: Enter the Windows XP key and the user name and password.


Step 5: Then you can set the location to be installed, maximum Disk space size and the RAM size. Follow the instructions normally. Finish the setup. It will continue to install Windows XP in your Virtual Machine.


Optional Note: While installing the Virtual Machine it may ask you to download VMware Tools for Windows 200 or later. It is recommended that you download it or you can download it later also.
 

After that, the installation process will continue by itself and Windows XP will start.


After successful installation Windows XP will start and you can see the System properties as shown below. 
512 MB of RAM
is set when installation(you can change the size in VM settings).
Now, you have successfully installed Windows XP virtual PC using VMware player. In order to quit Windows XP you can simply shutdown and quit VMware player.
To start the Windows again in virtual mode, open VMware Player and Select Windows XP in the left pane and Click Play virtual machine.


Let us discuss some of the issues which should be known by the users.

How to Transfer Data to and from Windows XP virtual Mode?

As you are running two different machines drag and drop will not work if you have not installed VMware tools. Even if you can copy directly, it takes more time. You can either use a flash drive or Disc drive to transfer data between Windows 7 and XP virtual mode. But this is not the optimal way. You need to map network drive in Windows 7 which has been shared from Virtual XP.
To enable file and folder sharing in Windows XP virtual Mode, you need to edit the settings. Click on Virtual Machine Settings as shown above to edit the settings.
Select Options and select Shared Folders. Set Always enabled and click OK
.


Now you need to share a folder with write permission as shown:
In Windows XP, right click on the folder or drive you want to share and select
Share and Security. Do not forget to check Allow network users to change my files.


Now after sharing the folder in Virtual XP, you need to map the folder in Windows 7 as shown below:
Right Click on My Computer and Select Map network drive. Under Network search for the folder you have shared in Virtual XP Machine and click OK.


You can copy or paste anything from or to the network location drive in Windows 7. This is how you can transfer files between Windows 7 and Windows XP virtual mode.

Removable Devices:

Now if you want to use a removable device like a flash drive, you can connect the device using the following setting:


You need to disconnect the device from the host in order to connect to the Virtual machine.

Step 6. Running Microsoft’s Windows XP Virtual PC:

All the above installation is not done using the Microsoft’s Virtual  Windows XP PC. Above we used normal Windows XP installation CD. If you have downloaded Virtual XP PC from Download Windows XP Mode then,  install it on your PC and then you can open the Virtual Machine from the VMware Player as follows.

Browse for the .vmx file in the folder you have installed the Virtual XP PC and  Click Open. You can run it.
Finally, as you have successfully installed Windows XP Virtual PC in Windows 7 using VMware Player 3.0.1 you can enjoy the unbeatable features of Windows XP in Windows 7 also.


Note: No new Partition is created in your hard disk for the Virtual PC. Just a virtual disk file is created in your drive which will increase in size according to what you copy and install in your Virtual PC. The maximum size of this file is the size you have set as maximum disk size.

Monday, August 8, 2011 1 comments

Cooliris - The 3D way of Image Searching..!!

Here i brought a new cool application for your browser to view or Search the images In a 3D style. The preview of this service is given below 


to enjoy this service goto cooliris website.
http://www.cooliris.com/tab/

Here you will found following page as shown in below image, Click on Download to download appropriate plug in for your Browser. It takes only 2 or 3 minutes for Slow connection Plan.


While Downloading If any error Occurs related to certificate verification. You Should follow the below steps to Solve your problem and enjoy this Service.
Here Select Release notes from Desktop menu...as shown above then Select version of cool iris you want.

If you are Google Chrome User then Go to chrome's aap Store by CLICK HERE   or   Go to below Link Manually

https://chrome.google.com/webstore/detail/noocneohefmdhonidldnlhaainpiomkp


IF You are Google Chrome User then See below Page and Read details


After successfully Installing plug-in For your browser You able to access This Link
http://www.cooliris.com/tab/


by setting your choice to display this 3D wall you can make more fun this is really amazing and cool to view images than typical Googl's image search engine.

If further query Related to this service you can post your poblems by comment on this post. we are happy to help you and solve your confusion related this post as soon as possible.

Enjoy this Gift....friends, On this Friendship Day
1 comments

Free AVAST Antivirus Licensed up to 2038.


You suffering from this questions?
-Which is the Best Antivirus?
-Which will give me free support?
-Which is completely free?
-Which will protects my computer and my WEB?
-Then don't worry, this article is for you guys,


-The best FREE antivirus and even I'm using is AVAST.


-It's best (Hey not Best as Quick Heal Because it has one of best security, but it is one of best free service that I have ever Trusted )
-If you will USE this Antivirus then By using my KEY , you can Increase it's validity Up to 2038......!!!!
-So, no need to worry till next 27 YEARS.
download   KEY HERE
Download Free Antivirus AVAST from HERE 

 
Download this ANTIVIRUS , Install it, than to Increase it's Validity,  do following steps,

1. Open AVAST, Go to MAINTENANCE,

2.Click on Registration.
3.Insert One of any Key provided above.
it's DONE.

Warning :- MAKE SURE YOUR INTERNET CONNECTION IS DISABLED WHILE INSERTING KEY.
Saturday, August 6, 2011 0 comments

Download IDM Full Version with Patch..!!!

Now enjoy this Free version of IDM , Forget about DEMO version of 30days...

 Just Copy the Patch given with it to your program files  folder. and simply run it which seen like below.


This will give you full version. Just click on download Button below to Download It.

Enjoy Friends..!!!
Sunday, July 31, 2011 0 comments

Login To Your PC Using Face Recognition System.!!

Do you get bored to select your username and then enter a password to every time you login? Not in old versions of windows but also in newly Windows 7. Why has there not been a built-in Windows feature to change the way of users login to Windows? 

Here you need Luxand Blink! Pro.


 Every new version of Windows brings improvements over its previous versions like interface, desktop customization, handling files, or security but why the Welcome Screen and the way users login still unchanged. Don't worry we've an alternative to traditional Windows login which known as Luxand Blink. It provides its users with a different way i.e. through facial recognition to login to Windows.


 Luxand Blink starts running after the computer starts up but before it has logged on to any account. We can then look into the webcam and have our face recognized by the application. It uses its advance image recognition algorithms to recognize our face. Such is the competence of this application, that whether the lighting is different or our hair are different, Luxand Blink will still recognize our face and log us in.


 Blink! Pro makes logging into Windows happen in a blink of an eye. Just look into a webcam, and Blink! Pro will identify your face and let you in instantly. It has never been easier! Blink! Pro employs advanced biometric identification technologies to ensure secure near-instantaneous authentication.
Adaptive Face Identification: Blink! Pro comes equipped with identification techniques that adapt to varying lighting conditions, and can tolerate a wide range of changes in the appearance of a person. Tungsten and fluorescent lighting, makeup and new haircuts, beards and moustaches, glasses and contacts are among the many things that are easily tolerated.


Secure Authentication: Biometric user authentication is considered more secure than old-fashioned logins and passwords. While passwords of reasonably secure length are hard to remember and end up on yellow sticky notes, face-based biometric authentication is nearly infallible. In addition to the added security of biometric login, Blink! Pro offers corporate users the ability to record who logs into Windows and when, regardless of whether password-based or biometric authentication has been used. Each record is accompanied by a webcam snapshot, allowing combating identity theft and identifying compromised Windows accounts. In addition, Blink! Pro offers the ability to continuously monitor whether the registered user or anybody at all is present in front of a PC, locking access if nobody is there for a defined period of time.
More Is Coming: Blink! Pro is an innovative product undergoing constant development and development. More features are coming in the near future, including the ability to register multiple faces for sharing a single Windows account, and support for completely unobtrusive background operation.

Supported OS: Windows Vista and 7.


Free Download Link for Luxand Blink! Pro 2.3: (16 MB)
Luxand Blink! Pro 2.3.rar (Link 1)
Luxand Blink! Pro 2.3.zip
(Link 2)
Luxand Blink! Pro 2.3.rar
(Link 3)
Luxand Blink! Pro 2.3.rar (Original Setup)

Enjoy More CLICK HERE
 
; Twitter Bird Gadget