Wednesday, June 25, 2014 5 comments

Root HTC wildfire S and install custom recovery


HTC Wildfire S is also low-end Android phone from HTC. This tutorial will help you to Root HTC wildfire by using simplest method. Rooting in Android will give you access to core files and more control over full system. After rooting you can install 3rd party apps, customized themes, customized ROMS and unleash the facility to change system capabilities such as overclocking CPU,changing memory allocation etc.. Most of the time Rooting any device weren't really comfortable as most of the time users break their device.


NOTE: Rooting will void your warranty or may brick your device. BIG IDEA will not be responsible for any damage.(chill guys it will not happen if you follow the instrunctios given here properly.. :-) )

Prepare for Rooting Process

  • Min. 60% battery backup in phone.
  • Download root checker from play store.( To check phone rooted properly or not)
  • Download HTC SYNC for Computer (use: to recognize commands at computer)
  • Download HTC drivers
  • Download Unlock tools ( This folder will require during unlocking the boot loader of your HTC device)
  • Process for Rooting

    1) Install HTC Sync and HTC drivers on your computer.

    2) Unlock your device's bootloader.

    Here boot loader unlocking process you will need to create account on htc website. then unlock boot loader as instructed. www.htcdev.com/bootloader.

    Note : If you can't find your device (htc wildfire S ) name in list. then simply select other supported devices.It's work perfectly.


    3) Install custom Recovery for HTC Wildfire S


    To do this process follow all procedure on official XDA Developers website Click Here

    That's it. Superuser will be installed on the phone along with Busybox and the su binary. You will be able to allow access to applications needing root permissions now.


    You have successfully rooted HTC wildfire S. Now you can place any custom ROM (.zip) in SD-card and install it on your phone.
    keep visiting Bigidea for further solutions and updates.! Hey guys if you like the posts then follow us,you can subscribe for regular updates, and don't forget to post your comments.!! 

    Monday, December 9, 2013 2 comments

    Which HTC Explorer Custom ROM to choose?

    There are so many ROMS that sometimes people do get confused on which one to try. Here I’ll give a detailed review on which rom you should use for your HTC Explorer.  Of course to flash custom roms you first have to root your phone. You can easily do that by our tutorial.

    1- Cyanogen Mod 10.2 Weekly Builds

    Android 4.3 was released a few months ago, porting it to HTC Explorer was a lot of hard work and the developing team did a remarkable job. This port has absolutely no bugs and a complete refined Android 4.3 experience. The best thing about this Rom is that Developers are constantly working on it. They provide updates every week to keep the ROM smooth and stable.

    Downloads and Instructions
    1. Download the latest build and Gapps from here.
    2. Copy the packages to your SD Card.
    3. Wipe data and factory Reset.
    4. Press Install Zip and then install the Rom and Gapps.
    5. Reboot


    MIUIV5
    2- MIUI V5

    MIUI V5 is a completely different experience for you, They have redesigned every element of Android and made it simple and minimalistic. This Rom was ported by legendlee. MIUI V5 is the latest version of MIUI it has a lot of new features. MIUI gives a refreshing look to your HTC Explorer.
    Downloads and Instructions
    1. Download the latest version of MIUI from here
    2. Wipe Everything in Recovery
    3. Flash the ROM.
    4. Reboot


    3- Triumph HD

    Triumps HD Rom is the most heavily developed Cyanogen ROM, installing the ROM has been simplified with Aroma Installer. The ROM is filled with lots of features. This ROM is my daily driver these days. It allows you to change font, keyboard, boot animation, music player and it includes many other sound mods too. The best thing about Triumph HD is that its filled with lots of tweaks. Which make the phone more responsive.
    Downloads and Instructions
    1. Download the latest version of ROM and Gapps.
    2. Wipe Everything in Recovery.
    3. Install the ROM.
    4. Reboot.

    First boot will take about 20 minutes because the ROM has many startup scripts.


    Revolution
    4- Revolution Sense 5

    Revolutions Sense 5 was created by vaibhav1. He included many new features to an already incredible FlyRom, it has Sense 5 icons, the interface looks different and refreshing. The best part about this ROM is that the developer has added MyHub. MyHub is an all in one place for customization. Custom Boot Screens, Themes, Skins, Kernels and Fonts can be found in MyHub. Overall the ROM is good in performance and very responsive. A lot of RAM is free for the user, which makes it faster than other ROMS.
    Downloads and Instructions
    1. Download the ROM from here
    2. Wipe Everything in Recovery except SD-Card
    3. Flash the ROM
    5-FlyROM

    This ROM has Android 4.0.3 with HTC Sense 4.0 and It is based on Derefas’s Rom and FlyRom is made by shekhutanwar. I like this ROM because it’s the fastest Sense 4.0 ROM available for Explorer. It has been modified for the best performance. It has no major bugs. It supports the latest and the fastest Kernel; it can be overclocked to 800 Mhz safely and it has Sony Bravia Engine 2.

    The Fly Rom is not themed. It features stock HTC Sense 4.0 experience and it’s faster than any other sense 4 ROM. It has no bloat-ware (useless stock apps) and it has a great memory script, which transfers all your apps to your sd-ext.

    How to install?

    Before we move on to the instructions, first you have to make an EXT partition of at least 1 gigabyteMemory Script: http://bit.ly/12d7j4Z
    Every sense 4 ROM requires an ext partition. If you haven’t created one you can read our tutorial to make an ext partition .

    1. Download these files: Rom: http://bit.ly/14PqRzm , Patch:http://bit.ly/13qUL03 and Open the Rom file (FlyRom v4) via WinRAR. Navigate to (system/etc/init.d) then drag and drop the memory script (10FlyScript).
    2. Now copy the Rom file and the patch file to your SD-Card.
    3. Go to the recovery and press ‘wipe data factory reset’. Then flash the ROM by pressing ‘install zip from sd-card’.
    4. After flashing the ROM turn your phone on. The first boot will take a lot of time so don’t worry.
    5. When your phone boots up and you see the setup screen reboot the phone and complete the setup.
    6. After completing the setup go back to the recovery and flash the patch file.
    7. Reboot the Phone.

    Make your phone fly by using flyrom!

    STHD-ThinkingBridge-HTC Explorer Custom Roms

    6- S.H.T.D ROM

    I liked this ROM so much that I used it for a month. The S.T.H.D stands for Super Hardcore Transparency Deluxe Rom. It has stock Android 4.1.2 and it has no bugs. Its based on CyanogenMod-10. As the name says its really transparent the settings, messaging, menus literally everything turns transparent and looks amazing with your wallpaper. The ROM is super fast because its filled with many tweaks. The best thing about it is that it has a pre-loaded memory script. If you have an ext the apps will automatically move to your ext.

    How to install?

    1. Download the ROM file from here http://bit.ly/14pO7oR
    2. Download the Google Apps file from here http://bit.ly/13i68U8
    3. Copy these files to your SD-Card.
    4. To go to recovery and press ‘wipe data factory reset’ or simple Factory Reset on TWRP.
    5. Flash the ROM by pressing ‘Install Zip from Sd-Card’ then flash the gapps (google apps).
    6. Done.


    RexBuild-STHD-ThinkingBridge-HTC Explorer Custom Roms

    7- RexBuild ROM

    When the HTC One came out with Sense 5 I instantly became a fan of it. I loved the sense 5 icons and the whole interface. This ROM features sense 4 and Android 4.0.3 but it has been modified to look and feel like Sense 5. It is based on Derafas’s Rom. It has sense 5 icons, sense 5 styled apps and it has no major bugs. The interface looks amazing on the phone. The main HTC clock widget has been modified to look better too. This makes the phone different looking from the other ROMS.

    The best thing I like about this ROM is it’s font – I will talk about it later.

    How to install ?

    1. Download the ROM file from here: http://d-h.st/A0M
    2. Copy the file to the SD-Card and Go to recovery.
    3. In the recovery mode press ‘wipe data and factory reset’ then ‘wipe-cache partition’.
    4. Then flash the ROM by pressing; ‘install zip from sd-card’ reboot the phone.
    5. Boot the phone after installation then reboot it.
    6. Complete the Setup and enjoy the sense 5 interface.
    7. There’s another sense 5 rom by Hpsgill, which came before this one and its remarkable too you can see that one here:http://bit.ly/10HGYva


    RevoltJB-RexBuild-STHD-ThinkingBridge-HTC Explorer Custom Roms


    8- ReVolt JB

    This ROM is for the people who like to get tablet interface on their phone. The ReVolt JB ROM features android 4.2 but, it has some bugs. It has Rom Control from AOKP, Paranoid Preferences from Paranoid Android; Cyanogen Mod profiles Pie Controls and all the Android 4.2 features. Of course the ROM also allows changing between phone and tablet or hybrid interface, and it has a lot of customization to make the user experience better.

    Bugs

    1. Gallery video playback. Use MX player for that.
    2. Video Recording. Use video-cam illusion for that.
    3. Bluetooth doesn’t completely work.
    4. You can use Jarvis Kernel for memory script and great performance.


    How to install ?

    1. Download the rom file from here http://bit.ly/14pYnNX
    2. Download the Google Apps file from herehttp://bit.ly/19T52SR
    3. Copy these files to your SD-Card and go to recovery.
    4. In the recovery press ‘wipe data/factory Reset’.
    5. Flash the rom by pressing ‘install zip from sd-card’ then flash gapps (google apps.)
    6. Done!


    More stuff coming soon... stay pinged to BIGIDEA.
    Saturday, October 26, 2013 0 comments

    Install Sony Xperia custom ROM to your HTC

    XperiaLised_Sense v2.0

            Install the different types of custom ROMs after the rooting your device. Here is the one of the most commonly used and STABLE CUSTOM ROM for HTC DESIRE C. In most of custom ROMs may you have found that problems of Wi-fi Hotspot or Data connectivity with other Mods,but its a STABLE and working fine all the features depicted below.

    Features
    ü  XPERIA Z Home Launcher !!! More smooth
    ü  ACID Walkman Engine 8.0 ( Even More Amazing Sound )
    ü  All New Widgets with Walkman widget includes bubbles and change colour according to backround
    ü  Xperia Z - Full sounds ported !! ( note all HTC sounds has been replaced by xperia Z So after booting up change your notification and ringtone as per your desire)
    ü  New System UI !!!
    ü  Ported Xperia S framework !!
    ü  Themed Dialer !!!
    ü  Themed Contacts !!!
    ü  Themed Messaging !!
    ü  Themed Settings !!!
    ü  Few IMP Icons Ported No need for Xperia Icon pack anymore !!
    ü  lots of unwanted HTC stuff removed !!!

    ü  Bottom line - More XPERIA FeeL with Lighter Package !!! and Even More Smooth !! Just 268 Mb

    Download the Zip file from here and save it to your SDcard without extracting it. (just paste as it is)


    More Screen Shots

    Please Note : Big idea is not responsible for any kind of damage to your phone.You can do this at your own risk.This method is tested by admin. It works perfect.

    How to Install ???

    1) First install the custom recovery for your phone. 

    -Mostly two popular recoveries are available for all HTC devices.

    •       TWRP (Team Win Recovery Project)
    •       CWM (Clock Work Mod)
    For HTC desire C model as i suggested in previous post , CWM works perfectly. 

    2) After completing installation of recovery. turn on your phone in boot mode ( press volume down + power )

    select recovery option from list. After selecting phone will restarts in recovery mode and looks like as shown below.


    then you will come across to the following interface


    3) Scroll down to the Wipe data/factory reset option then select Yes from next screen from list. then go to back.


    4) Similarly select " wipe cache partition " and also choose Yes as above.

    NOTE : wipe of cache partition and data mandatory in order to install any custom ROM , if it can't be performed your device may lead to unpredicted behaviour.

    5) Now go back to main menu and select "choose zip from sdcard" option.


    6)Then Select the .zip file (which you have downloaded and placed to sdcard as said earlier above) to install. then select "yes".

    Feel relax. after the completion of installation it will shows you message " installation from sdcard completed"
    Then restart your phone Normally.you will enjoy your newly installed custom ROM.

    Special thanks to XDA developers for porting such a great ROM for HTC ! 
    press like button to forum.xda-developers.com/showpost.php?p=40377011&postcount=66

    Upcoming post..... coming soon.

    In some of the ROMs requires to flash the new boot image file after the installation of .zip. So How to Flash any Boot.img (boot image file which is required to boot some Stock ROMs or Custom ROMs)
    Tuesday, October 22, 2013 8 comments

    How to Root HTC Desire C.

    The HTC Desire C is low-end Android phone from HTC. This tutorial help you to Root HTC desire by using simplest method. Rooting in Android will give you access to core files and more control over full system. After rooting you can install 3rd party apps, customized themes, and unleash the facility to change system capabilities such as overclocking CPU,changing memory allocation etc.. Most of the time Rooting any device weren’t really comfortable as most of the time users break their device.

    NOTE: Rooting will void your warranty or may brick your device. BIG IDEA will not be responsible for any damage.(chill guys it will not happen if you follow the instrunctios given here properly.. :-) )

    Prepare for Rooting Process.


  • Min. 60% battery backup in phone.
  • Download rootchecker from playstore.( To check phon rooted properly or not)
  • Download HTC SYNC for Computer (use: to recognize commands at computer)
  • Download HTC drivers
  • Download Htc Desire C toolkit1.5 (It is neccessary to install recovery in easy way)
  • Download Unlock tools ( This folder will require during unlocking the boot loader of your HTC device)

  • Process for Rooting.


    1) Install HTC Sync and HTC drivers on your computer.

    2) Unlock your device's bootloader.

    - Here boot loader unlocking process you will need to create account on htc website. then unlock boot loader as instructed. www.htcdev.com/bootloader.
    Note : If you can't find your device (htc desire C ) name in list. then simply select other supported devices.It's work perfectly.

    3) Install custom Recovery for HTC DesireC


    • It will open the following DOS window.

    • Now enable the USB debugging in your phone from developer option. then switch off the phone.
    • Now turn ON your phone in fast boot mode. (Press volume key down + power button together)


    • Now open DesireC toolkit1.5 DOS window. In which install recovery by pressing 1 or 2 or 3. I prefer 2 (stable) { because i am more comfortable with buttons control rather than touch in recovery mode. :p :) } Then press Enter.


    • After installation finishes. Enter 8 to root your HTC desireC. In few seconds you'll get message     " your device rooted successfully. ".
    • Now just reboot your phone. It will shows you "Android is upgrading..."
    4) Rooting process is finished.

    5) Now you can see " Superuser app" in app list.

    6) You can check the root status in root checker app.

    7) Press "Verify Root Access"
    You have successfully rooted HTC desire C. Now you can place any custom ROM (.zip) in SD-card and install it on your phone.

     keep visiting Bigidea for further solutions and updates.! Hey guys if you like the posts then follow us,you can subscribe for regular updates, and don't forget to post your comments.!! 

     " How to install custom ROM on your android phone??" coming soon...
    Saturday, July 14, 2012 4 comments

    Google Image seek Under water(afloat in water)-delight google under water

    Go through the fresh case by google explore which is google look for under water.

    It's a google image search port,which has been deseigned for amusing..!!


    Click On Image Above given to Go there. Enjoyyy :)


    If you like this post Also recommend your friends to Join our site.!!
    Saturday, June 30, 2012 0 comments

    Windows 7(ultimate) Full Version Download with Resume support!


    Windows 7 was a standalone package which could be installed on existing operating system. We had to install it separately to upgrade Windows 7 to SP 1though, one could create custom DVD integrating Service Pack 1 with Windows 7 DVD.
    Here I am sharing the direct links to download Windows 7 DVD with SP1 hosted on official Servers of Microsoft.


    ♦ Windows 7 Ultimate x86 SP1 Bootable
    ♦ Windows 7 Ultimate x64 SP1 Bootable

    Specially suited for those lazy ones who want to install Windows integrated with Service Pack 1 without taking manual efforts. The links point to Windows 7 Ultimate SP1 DVD ( 32 Bit and 64 Bit versions). We know that there are other versions of Windows 7 so, if you feel then after installing the Ultimate version- you can downgrade Windows 7 version.
    ISO downloaded can be directly burned to DVD and it’s bootable.

    Monday, June 25, 2012 6 comments

    Unlock HUAWEI E1732 idea Netsetter(7.2Mbps) latest updated 2012

           Recently idea has launched 3G huawei USB modem [E-1732]. Which is having max speed of 7.2Mbps but main problem was that can be unlocked using firmware upgrade or downgrade method because its having customized firmware.Although if you have tried all above methods but quite problems still we have to face during unlocking.

          Unlock E-1732 using DC Unlocker but main drawback was its not free it require some Credites but finally i am here with the permanent solution for E1732 which is totally free so go ahead and unlock  your E-1732 which is locked from last few months.

    Requirements :~

    1) CDMA Workshop (click here to download)  (click on Skip Add. to begin download)

    2)E-1732 Downgrader (clik here to download)


    Steps you have to Follow

    1) First of all download all requirements (you may need to disable your antivirus)
    Plug your E1732 with any other operator sim and let it install its driver
    Now just Right click on your MY COMPUTER ICON >> PROPERTIES >> DEVICE MANAGER >>Ports (COM & LPT) then you can see there something like HUAWEI Mobile Connect – 3G Application Interface (COM8) then com8 is your systems port number please note the port number
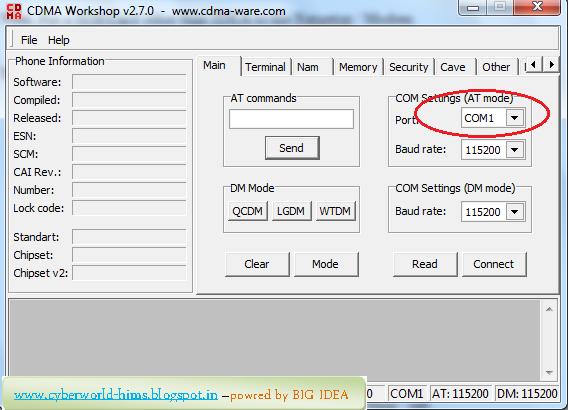
    Now Run CDMA WOrkshop.Exe and  Click on Main and select the com port number in COM Settings (AT mode)box.


    2)Then You have to click on Connect.


    3)Then Click On Read and Let it read your modem information and you can see your modem information on left panel..


    4) Now Click on Security Tab >> SPC >> Default (nv_read) as SPC and Type 000000 in blank box and click on spc and you can see the pop up window, click on SEND


    5)Now Just Navigate to Memory Tab >> NV Items >> And Click On Read you can see on pop up box now click on OK.
         
    Now you can see onw NV Backup Box now in Last NV Item box type 9999 and click on ok and save it with any name. and it will backup your data let it be complete to 100% . and minimize CDMA Work Shop.


    6)Now Run E1732 Downgreder >> Accept Terms and Conation >> Then Click On Next and it will read your modem let it be finish then it will show your modem data then click on Start.


    In the process you will get massage like update failure after downloading program. then dont worry and click on OK.
    Then Again Come on CDMA Workshop and come on Main Tab and click on Disconnect and unplug your modem.


            Now Again Plug your modem and Run CDMA Workshop and check and select Com port as pr we have done previously


    Then come on CDMA wokrshop and Select Com Port and click on Connect and navigate to Memory Tab >> NV ITEMS >> Click On Write >> now you can see one confirm box click on OK. then Click on Open then borwse and select the file which we have saved before.


    When the process will reach at 100% you can see success message then click on OK and From Main Tab Disconnect your modem and you are Done.

    Warning: Please contact us if you have any difficulties or if you have little technical knowledge. This trick Works perfactly , tested by me on 6 modems of same. so please do not put stupid comments.If you have more knowledge then share here by comments your most welcome.  - HIMS


    DOWNLOAD COMPLETE VIDEO TUTORIAL ABOUT HOW TO UNLOCK E-1732


    Saturday, June 23, 2012 0 comments

    Find And Update Missing Windows Drivers Automatically.

    free-automatic-driver-updater
    Finding the hardware drivers of your windows PC might become very time consuming ,if you are trying to find it manually. Especially when you are working with freshly installed OS on an assembled computer or recently formatted your PC/Laptop. There are many soft wares which provides automatic installation of newest hardware drivers, But most of them are paid software and many of us can't afford it. 

    How To Find Missing Drivers For Free ?

    Just go to DriverIdentifier. which provides a free software which helps us to find missing drivers and driver updates for our windows system. The software scans our computer for all installed hardwares and generates a web page with all our driver updates listed


    Follow my step by step guide:

    • Visit Driver Identifier website and download the software.
    • Install and run the DI software.
    • After opening the software, Click 'Scan Drivers'.
    • The software will start to scan for installed hardware and finding updates. (You need an active internet connection)
    • A new webpage will open with all your driver updates listed.
    • Click on the drivers you want to install or update.
    • Done.
    DIRECT DOWNLOAD FROM HERE!!
    Tuesday, April 17, 2012 1 comments

    Avid Media Composer 6.0.1 Full Version


    Media Composer 6 is a professional video editing software effective and efficient enough to produce high-quality video in a way and a very easy process. Some of the features supporting editing of audio and video are included in Avid Media Composer 6.0.1, just how you will easily adjust the position, sound, effects, contrast, lighting, transitions and a variety of tools that will make you admire after watching your video masterpiece.

    Features :
    # Full 64-bit power
    # Better performance and 3D with Avid hardware
    # Open for business
    # Gain efficiency with the sleek new user interface
    # Get stock footage and more in the Avid Marketplace
    # Work with 3D
    # Go hands-on with Artist Color
    # Mix in surround sound
    # Open to anything
    # Experience the “waitless” workflow
    # Work with any media
    # Take storytelling to the cutting edge
    # Collaborate with ease
    # Find the right clips and best takes fast
    # Gain peace of mind with reliable media management
    # Shop the Avid Marketplace
    # Design and dazzle with visual effects
    # Create studio-quality soundtracks
    # Color correct and grade with precision


    Screenshots :


    Requirement :
    Windows 7 64 bits
    2.33 GHz of Processor
    4 GB of RAM
    7200 rpm of hard disk with additional space


    Download Here :

    Avid Media Composer 6.0.1 Full Version


    Enjoy Friends.. if any problem post your comments...!!
    Saturday, April 14, 2012 8 comments

    Quick Heal Total Security 2012 Full License Crack


    Quick Heal Total Security 2012 Full License Crack claim to have great power to conduct a safe guard against your computer. Quick Heal Total Security 2012 Full Version promises to offer everything the user needs to stay on the safe side includes antivirus, antispyware tool, firewall, antiphishing utilities and many, many other things to preserve your valuable data.

    Download link is given in the end of this post it not resume supportable so use speedy network to complete the download because the file size is about 295MB

    Features of Quick Heal Total Security 2012 Full :
    AntiVirus
    AntiSpyware
    AntiMalware
    AntiRootkit
    Friday, April 13, 2012 1 comments

    Android Skin Pack for Windows 7 for Android Look

               Android is one of the most powerful and popular smartphone OS these days and every one like to talk about it. How if we transformation our Windows 7system into Android look? Ya, here a new Android transformation pack to make your Windows 7 to looks like Android with all icons, wallpapers, boot screen, login screen, cursors etc


    Android skin pack is full transformation pack this purpose to convert your Windows 7 PC into Google's Android OS. If you want to make Windows 7 look-like Google Android OS, this transformation pack is only for you.
    This new Android Skin Pack is a new customization pack for Windows 7 created by "hameddanger" of Deviantart. This pack comes with cool Android theme, boot screen, login screen, icons, cursors, wallpaper, dock and much more. The Android Skin Pack supports Windows 7, Windows 7 SP1, X86 (32Bit) or X64 (64-bit) and all Language.
                                                                           
                    Android Skin Pack 1.0 for Windows 7    (For 32-bit, 26.44 MB)
    Android Skin Pack 1.0 for Windows 7  (For 64-bit, 26.47 MB)


    Follow the blog and enjoy new tricks... 

     
    ; Twitter Bird Gadget